Ultimate Farmer is the safest all-around target for a normal Search for the Needle haystack clear because it helps across the full collect-sell-upgrade loop. If your run is held up by one tool, hauling, cash, or Diamond hunting, a specialist may suit you better, so this list separates general clear performance from those narrower goals.
The ranking covers all eight classes and prioritizes consistent hay removal, less run friction, and useful tool synergy. Roll chance is reference information only, not a measure of power, and the effects can change with Roblox updates; check the live class preview before spending Gems.
Search for the Needle Classes Tier List
This order is for a typical general-purpose haystack run, not an economy-only, automation-only, or resource-farming build. The summary below shows each class's main job; the exact values and tradeoffs are explained in the tier sections.
| Tier | Class | Main focus |
|---|---|---|
| S | Ultimate Farmer | Flexible full-run choice |
| A | Demolitionist | Explosive clearing |
| A | Drone Specialist | Automated collection |
| A | Forkmaster | Pitchfork clearing |
| B | Pack Mule | Carrying capacity |
| B | Hay Merchant | Upgrade income |
| C | Prospector | Diamond and resource value |
| D | Starter | Learning baseline |
Search for the Needle Tier List for All Classes Explained
The tier color is a starting point, not a rule that every player has to follow. The values below are current guide-sourced data rather than permanent developer guarantees, so use the in-game preview as the final check when the menu shows a different description.
S Tier
| Class | Roll chance | Supported effect | Best fit |
|---|---|---|---|
| Ultimate Farmer | 0.1% | Combines every other class bonus and can activate Golden Harvest. | Players wanting one flexible class for mixed clears. |
Ultimate Farmer (S Tier)
Ultimate Farmer leads because it does not ask you to commit to one part of the loop. Its value can show up in a tool-heavy run, a collection-heavy run, or a run focused on getting more from each sale, while Golden Harvest is an additional upside. That broad coverage is why it is the general recommendation even though a specialist can be a better fit for a specific bottleneck.
A Tier
| Class | Roll chance | Supported effect | Best fit |
|---|---|---|---|
| Demolitionist | 7% | +20% Dynamite blast radius and a 10% chance for TNT to split into three mini charges. | Players whose clear is slowed by large hay sections. |
| Drone Specialist | 1% | Always owns a Drone, with a 30% faster Drone, 40% more Drone capacity, and an occasional three-Drone swarm. | Players whose collection or hauling is the bottleneck. |
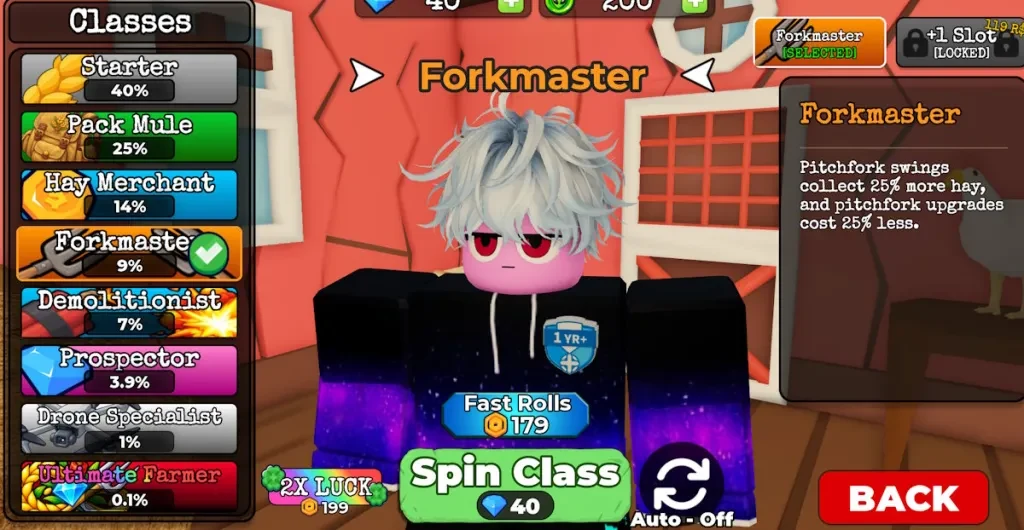
| Forkmaster | 9% | +25% hay per Pitchfork swing and -25% Pitchfork upgrade cost. | Players building a run around the Pitchfork. |
Demolitionist (A Tier)
Dynamite changes the shape of a run: blasted hay lands loose on the ground, so large explosions can reduce the pressure to keep a full bag ready. Choose Demolitionist when breaking big sections is the slowest part of the route; if you mostly rely on a Pitchfork, the passive has fewer chances to matter.
Drone Specialist (A Tier)
Drone Specialist addresses the handoff after hay is broken. Its improvements can keep more collected hay moving while you handle another part of the run, and the occasional swarm helps during a burst of loose hay. Some broader farming lists place it in S because they value automation more; this ranking keeps it in A because direct hay removal and tool impact matter more for a general clear.
Forkmaster (A Tier)
Forkmaster is the most focused A-tier choice. It pays off when Pitchfork swings make up most of your manual clearing, and the lower upgrade price makes that route easier to invest in. It has less value if you are still clearing mainly with Dynamite or relying on Drones.
B Tier
| Class | Roll chance | Supported effect | Best fit |
|---|---|---|---|
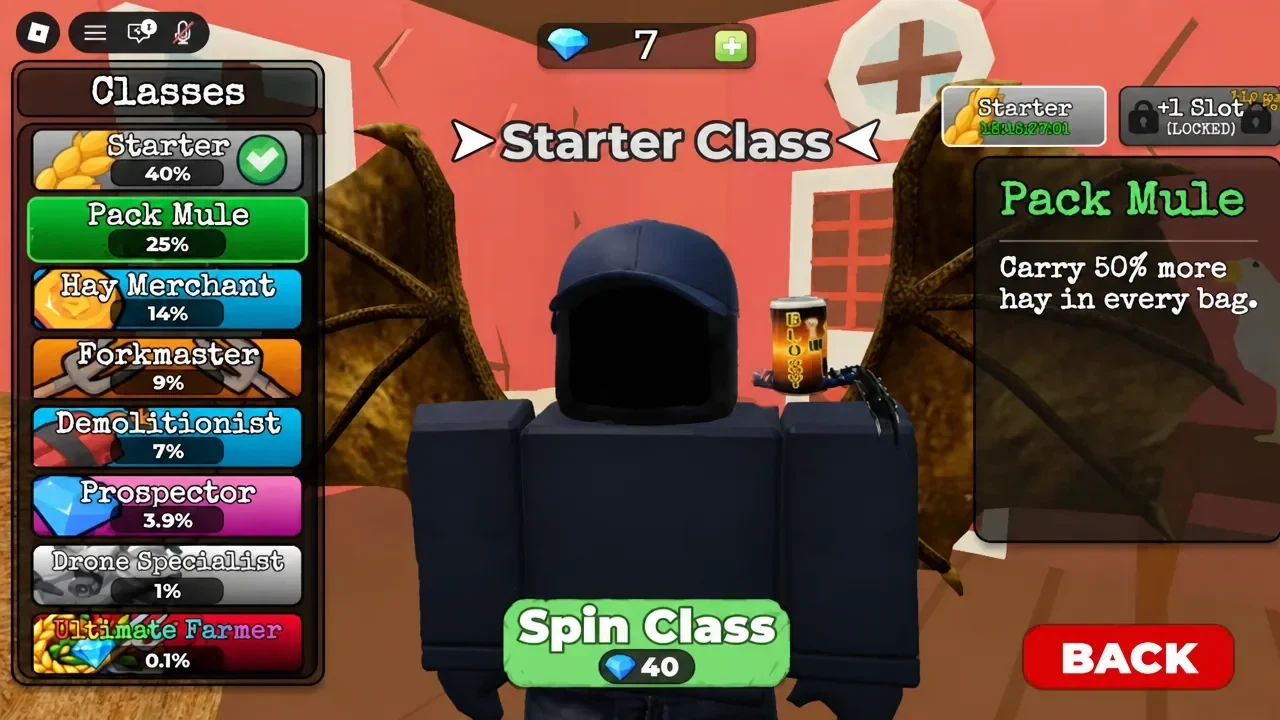
| Pack Mule | 25% | +50% carry capacity in every bag. | Players who lose time making trips to the cow. |
| Hay Merchant | 14% | +20% money from selling hay. | Players saving for Dynamite, the Pitchfork, or other upgrades. |
Pack Mule (B Tier)
Pack Mule's value is measured in interruptions. If your bag fills before a cow trip would otherwise be convenient, the extra room keeps the run moving. It is strongest during the manual-collection portion and naturally falls behind once other tools do more of the work.
Hay Merchant (B Tier)
Hay Merchant is an economy accelerator, not a clearing modifier. Choose it when waiting for the next upgrade is the part slowing you down; otherwise, the direct tool classes produce a more immediate change to the clear.
C Tier
| Class | Roll chance | Supported effect | Best fit |
|---|---|---|---|
| Prospector | 3.9% | Diamonds appear 50% more often, and hay can transform into Diamonds. | Players who value extra resources more than the fastest clear. |
Prospector (C Tier)
Prospector is a deliberate trade: it makes the resources from a run more valuable, but it does not make the clear itself faster. Pick it when Diamond opportunities are your goal. Resource-focused guides place it higher for that reason, which reflects a different priority from this clear-time list.
D Tier
| Class | Roll chance | Supported effect | Best fit |
|---|---|---|---|
| Starter | 40% | The default class with no bonus. | Players learning the basic haystack loop. |
Starter (D Tier)
Starter is a useful baseline while you learn how collecting, selling, and upgrades fit together. Once you know which part of a run costs you the most time, a class with a relevant passive has more upside.
Which Search for the Needle Class Should You Choose?
Use the slowest step in your own run as the tie-breaker. If no single step dominates, Ultimate Farmer is the flexible target; otherwise, choose the specialist that matches the delay:
- Tool-first: Choose Demolitionist when large sections are slow to break, or Forkmaster when most of your manual clear comes from Pitchfork swings. The first suits an explosive route, while the second suits repeated tool swings.
- Collection-first: Choose Drone Specialist when hay is already loose but takes too long to move. Choose Pack Mule when filling bags and returning to the cow is the interruption you notice most.
- Upgrade or resource-first: Hay Merchant fits a run waiting on cash for the next purchase. Prospector fits a run where Diamond opportunities matter more than the fastest finish.
- Learning: Starter is a fine baseline while you learn the collect-sell-upgrade loop; once you know your bottleneck, a relevant passive has more upside.
Some broader farming lists put Drone Specialist in S and Prospector in A. That difference reflects giving automation and resource generation more weight than clear speed. If either goal matters more to you, move the class up in your personal ranking.
How to Use the Search for the Needle Classes Menu
Open the Classes booth or menu to review the roster and spin for a class with Gems. The reported spin price is 40 Gems, but verify the amount and passive shown in your game before spending because live Roblox systems can change. The Search for the Needle beginner guide also covers the collect-sell-upgrade loop and the menu context if you need a broader starting route.
Before spinning, decide whether your last run was slowed by breaking hay, carrying it, selling it, or gathering resources. Pick the class that fixes that delay, then recheck its in-game description after an update.