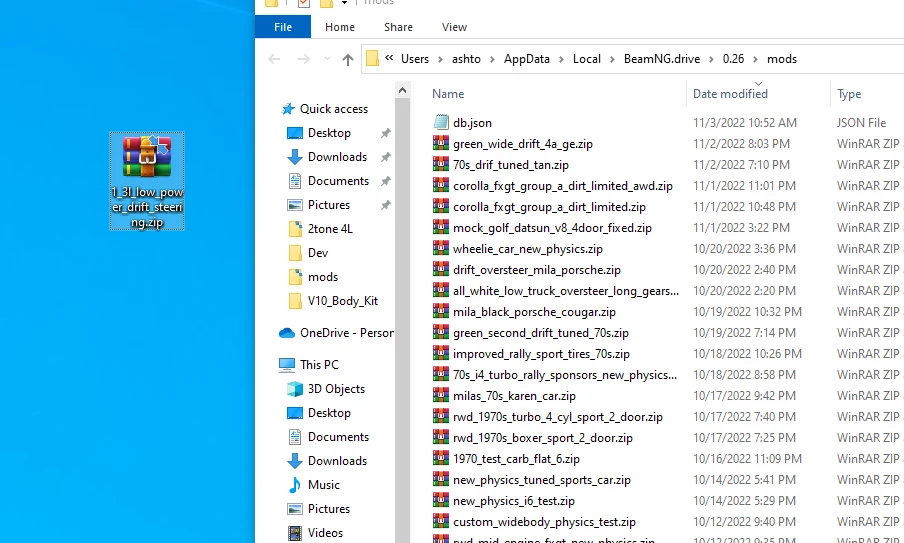
BeamNG.drive mods are add-ons that bring new vehicles, maps, scenarios and paint designs into the game. The easiest way to add one is through the in-game Repository, the game's built-in mod library: find a mod, choose Subscribe, and the game downloads it and turns it on for you. If you downloaded a mod as a ZIP file from a website, keep it zipped and place it in the mods folder inside your user folder.
Mods are stored in the user folder. Its location depends on your system:
| System | Default user folder | Mods folder |
|---|---|---|
| Windows | %LOCALAPPDATA%\BeamNG\BeamNG.drive\current | mods inside the user folder |
| Linux | ~/.local/share/BeamNG/BeamNG.drive/current | mods inside the user folder |
On Linux, the location is different if you assigned a custom folder yourself.
Install a Mod From the In-Game Repository
The Repository handles the download and setup for you, so it's the simplest way to get a mod.
- Open the Repository from the Main Menu or the Sidebar Menu.
- Search for a mod by name, or filter by category. Ratings and dates are shown to help you compare options.
- Check the mod's date before you subscribe. Old mods can be outdated or broken, and they can cause problems once they're enabled.
- Open the mod's page and click Subscribe.
- Wait for the download to finish. The mod turns on automatically, so there's nothing else to switch on.
Subscribing also means you receive automatic updates when the mod's author publishes changes, so you don't need to download a new file each time.
You can also browse the web version of the Repository. The buttons in the top-right corner of a mod's page each do something different:
- Subscribe opens the game and downloads the mod.
- View ingame opens the mod in the in-game Repository.
- Download Now saves a ZIP file to your browser, which then needs the manual steps in the next section.
How to Install a ZIP Mod Manually in BeamNG.drive
Some mods only come as a ZIP file, usually from a website. BeamNG.drive's standard mod format is a ZIP archive, so the file stays zipped.
Before you open any download, keep your antivirus software up to date and be careful with sites you don't trust. Skip EXE files and similar programs, since they won't work as-is in the game and may contain malicious software.
- Open the user folder from the launcher by choosing Launcher → Manage User Folder → Open in Explorer. Some launcher versions label the last option Open user folder, so look for either wording. On Linux, open the path from the table above, or the custom folder you chose.
- Open the version folder the launcher shows. On a standard Windows install, that's the
currentfolder. - Open the
modsfolder. If it isn't there, create a new folder with that exact name. - Move the ZIP into
modswithout extracting it. Don't put it in the game's install folder. - Start the game and open the in-game Mods Manager. If the mod's package has no errors, it will appear in the list.
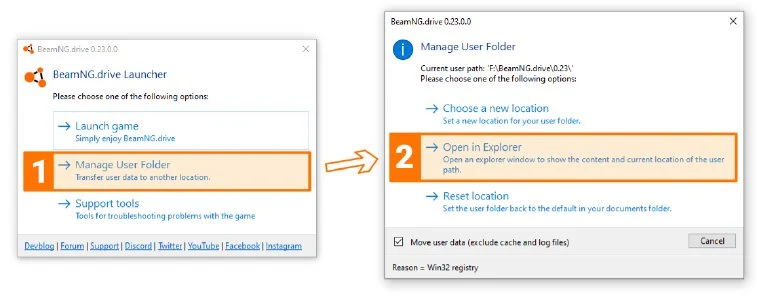
Why BeamNG.drive Mods Belong in the User Folder
BeamNG.drive uses two main folders. The install folder holds the game itself, while the user folder holds your own files, including mods (Repository downloads too), settings, saved vehicle configurations, replays and screenshots. Keeping them apart means your changes never touch the original game files, so you can always return to the original state.
The user folder mirrors the layout of the game folder. If a file exists in the same location in both, the version in the user folder loads over the original. That's also why a mod that replaces core game files can cause crashes, missing assets or odd vehicle behavior.
This matters most if you use Steam. Steam may flag files it doesn't recognize in the install folder and remove them during updates, file verification or reinstalls. That can wipe out your mods, settings and custom content with no warning, which is why mods belong in the user folder.
Turn Off, Update and Remove Mods
All installed mods are managed in the in-game Mods Manager. From there you can update mods, enable or disable them, and manage each one from the list. Use the option that matches what you want to do:
- To pause a mod: disable it in the Mods Manager. It stays installed, so you can turn it back on later.
- To remove a Repository mod: use its remove or unsubscribe action in the Mods Manager. Deleting only its ZIP can leave the subscription active, and the game may download the mod again.
- To remove a manual mod: delete its ZIP from the
modsfolder inside your user folder.
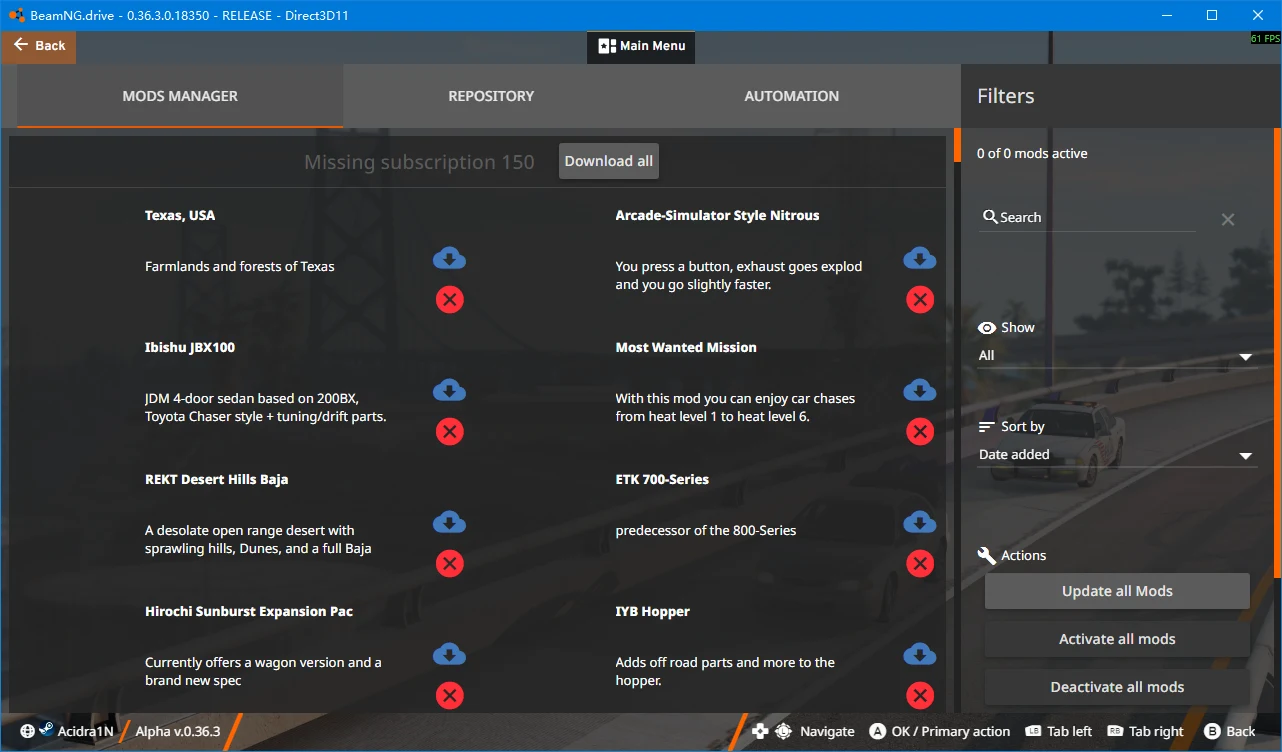
Keep your list manageable, too. The game recommends running no more than 20 to 30 mods at once, since mods can conflict with one another. Old or broken mods, incorrectly packaged ones and conflicts between mods can all lead to crashes, missing assets or vehicle behavior problems.
Fix a Mod That Does Not Show Up
A mod that doesn't appear usually has a wrong install location, an incorrectly packed ZIP, an error in the mod, or an outdated or broken release. Start with the location: the ZIP has to sit in mods inside the user folder and stay unextracted. Then check the mod's date, since an outdated release may not work with your version of the game.
If the mod is a vehicle, level, scenario, part or livery, look in its matching menu:
- Vehicles and vehicle configurations: vehicle selector
- Levels: level selector
- Scenarios: scenario selector
- Vehicle parts: vehicle configuration menu
- Liveries: vehicle configuration menu, then the Paint Design tab
Keep Mods Working After a Game Update
Game updates can change how mods behave. Major updates change the second number, such as 0.38 to 0.39, and minor updates change the third number, such as 0.38.4 to 0.38.5. A major update runs an automatic cleanup of the user folder, and any unknown files are backed up to a folder named by date and version, placed beside the current folder.
After an update, a mod may be deactivated, and the game may ask if you want to turn it back on. Only reactivate a mod after you've checked that it supports the updated game. Manual ZIP installs don't update on their own, so check the mod's page for a version that works with the new game and replace the old ZIP with it. Before you reinstall anything, look in the Mods Manager and your mods folder to see what's still there.
Recover From a Crash After an Update
If BeamNG.drive crashes, freezes or gets stuck on a loading screen after an update, the cause is usually an outdated or broken mod, old cache files, damaged game files or a known bug. Work through these steps in order, and start the game after each one to check whether the problem is gone.
- Check Known Issues. Open the Known Issues page and look for your problem. If it's listed, follow the workaround.
- Start in Safe Mode. Open Support Tools in the launcher and click Safe Mode. This starts the game without your mods and settings. If it runs, a mod or setting is the cause, and most often it's an outdated mod. If it still crashes, continue.
- Clear the cache. Open Support Tools in the launcher and click Clear Cache. This doesn't delete your mods, vehicles or settings. Old cache files move to a
backupfolder inside your user folder, and the first start afterward can take longer. - Verify the game files. Open Support Tools in the launcher and click Verify Integrity. You can also verify files through Steam or the Epic Games Store.
Find the Mod Causing Broken Textures
When textures or materials look wrong, such as missing surfaces or strange colors, start by testing with every mod turned off. That tells you whether a mod is responsible before you start removing anything.
- Disable all mods in the Mods Manager.
- Clear the cache from Support Tools in the launcher.
- Start the game and check whether the problem is gone while your mods stay disabled. If it is, a mod is the cause.
- Turn your mods back on one at a time, checking the game after each one, until the problem returns.
- Delete the mod that brought the problem back, then clear the cache once more.