A Dyson Sphere is a shell of structures built around a star to gather its energy. In Dyson Sphere Program, you build one by researching the launch tech, drawing the shell in the sphere editor, and sending parts into orbit. You can start with a temporary swarm of solar sails or go for a permanent shell built with rockets, and the two routes can run side by side. Ray Receivers on your planet then bring that energy down as power or turn it into Critical Photons.
| Part or tech | Research that unlocks it | What it does |
|---|---|---|
| EM-Rail Ejector | Solar Sail Orbit System | Launches Solar Sails into a swarm orbit |
| Solar Sail | Solar Sail Orbit System | Orbits as temporary swarm output, then fills finished shell cells |
| Vertical Launching Silo | Vertical Launching Silo | Launches Small Carrier Rockets |
| Small Carrier Rocket | Vertical Launching Silo | Builds the sphere's nodes and frames |
| Dyson Sphere Stress System | Level 1 follows Vertical Launching Silo | Widens the buildable band by 15 degrees per level |
| Ray Receiver | Ray Receiver | Sends sphere energy to your grid or converts it to Critical Photons |
Research the Tech in the Right Order
If you want power early, start with Solar Sail Orbit System and the Ray Receiver. Solar Sail Orbit System unlocks Solar Sails and the EM-Rail Ejector, which you need for the swarm route and for filling the shell later. The Ray Receiver has its own research node, so you can have it ready before the sphere is finished.
Vertical Launching Silo is the research for a permanent shell. It unlocks the silo and the Small Carrier Rocket, which build the sphere's nodes and frames. Dyson Sphere Stress System comes right after it, and it matters because until you research it, the shell can only be built as a thin belt around the equator. Each level you research adds 15 degrees, so keep going if your plan needs more coverage.
Draw the Dyson Sphere Shell Plan in the Editor
Every build starts with a plan. Press Y or click the Dyson Sphere icon in the lower-left corner to open the editor for the star you're working on. The editor is free-form and keeps swarm orbits and shell layers under separate controls, so you can set up both routes in one place.
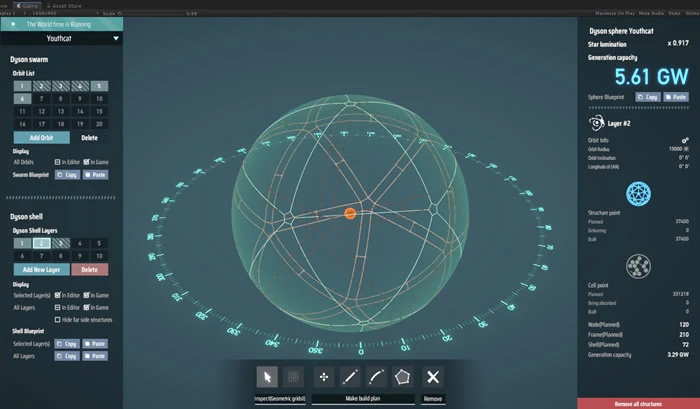
Build the shell in this order:
- Add a shell layer and set its orbit radius.
- Place nodes around that layer.
- Join the nodes with frames.
- Close off an area with frames, then click the pentagon icon to mark it as a shell cell.
- Create a swarm orbit too, if you plan to launch sails into one.
Nodes are the points, frames are the lines that join them, and a shell cell is a closed area you have marked. Only the areas you mark get built as shell, so check each closed area before you move on. Early on, the editor only lets you draw a narrow stripe around the equator, so your first cells will sit there.
Build the Permanent Shell With Silos and Rockets
The Vertical Launching Silo launches Small Carrier Rockets, and those rockets build both the nodes and the frames of the sphere. A silo only fires when a plan is drawn and still has nodes or frames waiting to be built. No plan means no launches, so get the editor set up first.
- Research Vertical Launching Silo.
- Draw a plan with unfinished nodes and frames.
- Feed Small Carrier Rockets into the Vertical Launching Silos.
Sails aren't loaded into rockets. Rockets carry the structure, and the sails come later through the ejectors. This is the slower half of the build, and it sets up the skeleton that the sails will fill. Sails only go into a shell's cells after that shell's frames are complete, so the rockets have to finish their work first.
Launch Solar Sails With EM-Rail Ejectors
A Dyson Swarm is the cloud of Solar Sails orbiting the star. EM-Rail Ejectors fire sails in a straight line at high speed, so the planet an ejector sits on can block its shot. Ejectors also can't be built next to other tall buildings, so leave some room around each one.
Each ejector needs a swarm orbit selected in its panel. It tracks a point on that orbit and only fires while its angle to the target stays between 5° and 60°. For a swarm orbit close to the equator, placing ejectors around 30 degrees latitude gives them the most firing time across the day. Ejectors on the equator lose time at noon when the angle is too high, and moving toward the poles cuts their uptime.
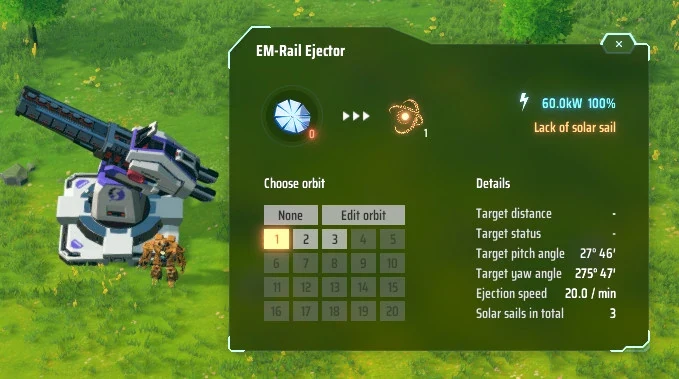
A single ejector can't fire nonstop, so plan for several:
- Feed Solar Sails into each EM-Rail Ejector.
- Select the target swarm orbit in each ejector's panel.
- Place each one where the planet isn't blocking its line of fire.
- Build several so the swarm keeps getting new sails.
Sails go into the swarm first and don't stay there. Sails in a swarm decay over time unless they're absorbed into a completed shell, so the swarm works as temporary output. Once a shell's frames are complete, the sails you launch fill its cells and stay in the sphere, where they last.
Swarm power is a bridge, not a replacement. Each sail costs energy to launch, and only part of a sail's output reaches your receivers. It can make sense to keep your existing power running until the permanent shell is ready.
Place Ray Receivers for Dyson Sphere Power
Ray Receivers sit on your planet and pull energy from the sphere or swarm. Build more than one, because a fully built sphere produces more energy than a single receiver can use. You don't need the whole shell first, since a partly built sphere can already send energy to receivers.
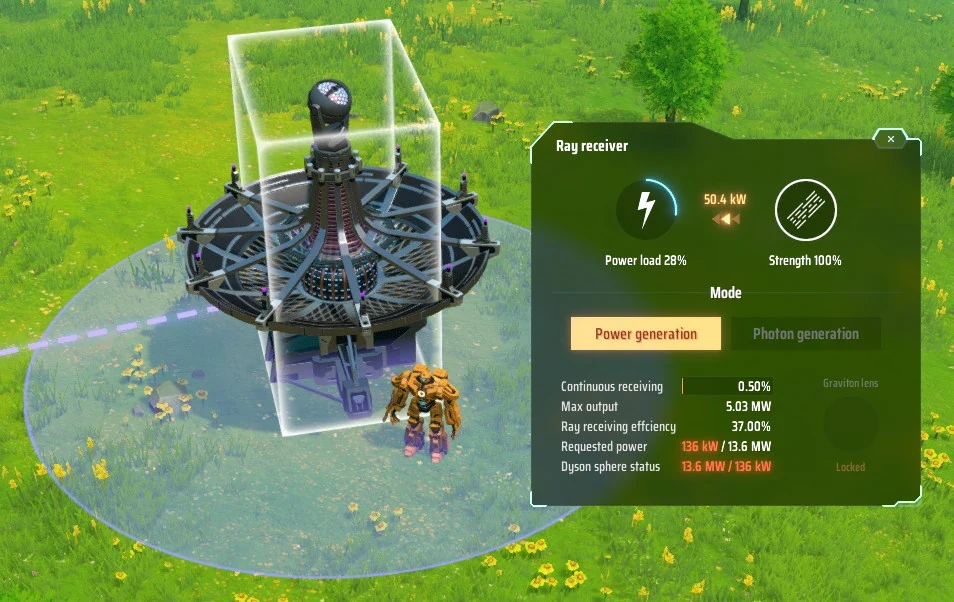
Each receiver shows a Strength reading from 0 to 100 percent, which tells you how well it picks up energy from the sphere. Placing receivers near the poles keeps Strength steadier on a planet with little axial tilt, because the sun's angle barely shifts across the year. A layer at the largest radius you can set also helps Strength, even if you never build nodes or shell on it. That trick works with sphere layers, but a swarm orbit at the same size doesn't help as much.
Continuous Receiving changes much more slowly. It starts at 0 on a new receiver, climbs while Strength is above 75 percent, and drops while Strength is below that. Aim for 100 percent, because it raises both the maximum output and how efficiently the receiver takes in energy.
Choose Between Grid Power and Critical Photons
Each Ray Receiver works in one of two modes, and you set each one separately. Energy Generation is available as soon as the Ray Receiver is unlocked, and it sends energy onto your power grid. Photon Generation requires Dirac Inversion Mechanism research, and it turns the received energy into Critical Photons.
Critical Photons matter because they lead to the end of the game. A Miniature Particle Collider turns them into Antimatter, which is one of the parts of Universe Matrices. You need several thousand Universe Matrices to beat the game, and Antimatter can only be made with the help of a working sphere, though that sphere doesn't need to be finished.
Maximum output rises with Continuous Receiving, Photon Generation mode, and lenses, and those boosts multiply together. They raise how much one receiver can handle, not how efficiently it takes energy from the sphere. Graviton Lenses are used up as they work and boost both output and Strength once Planetary Ionosphere Utilization is researched. The automatic buffer for Graviton Lenses holds 2 at a time, and the Dark Fog Lens is another option that lets receivers collect sphere energy with lower losses and at a higher rate.