

Transport Fever 3 is a transport-building game in which you connect towns and industries with roads, railways, and vehicles. The fastest way to get money flowing is to finish one short, complete service that carries cargo or passengers to a place that actually wants them, then keep its vehicles loaded. Build only what that route needs, borrow just enough to finish it, and make sure it earns more than it costs before you expand.
| Early option | How it brings in money | Works best when | Main thing to watch |
|---|---|---|---|
| Cargo route | Pays when goods reach the town or industry that uses them | A town's commercial district wants the goods and the route is short | Warehouse legs earn nothing until the final delivery |
| Passenger bus link | Pays for each passenger carried | Two neighboring towns can be connected directly | A single stop reaches only nearby residents |
| Subsidy | Pays on acceptance, with possible completion rewards or doubled income | The required route matches a link you already need | The deadline starts when you accept |
| Loan | Funds construction; it isn't income | You need cash to finish the first complete route | Payments continue every month until the balance is cleared |
Pick a First Route With a Destination That Wants What It Carries
Money comes from moving goods (cargo) or people (passengers) to a place that needs them, so every early route needs a clear destination at the far end. For passengers, a direct bus connection between two neighboring towns is the simplest start. A stop only reaches residents close by, so use more than one stop in a town or add a short local bus line to reach more people.
For cargo, look for a short chain that delivers something a town's commercial district wants. Check the town's displayed demand before you build anything, because a line that delivers goods nobody has asked for earns nothing. Vegetables and fish are good early examples of what towns want.
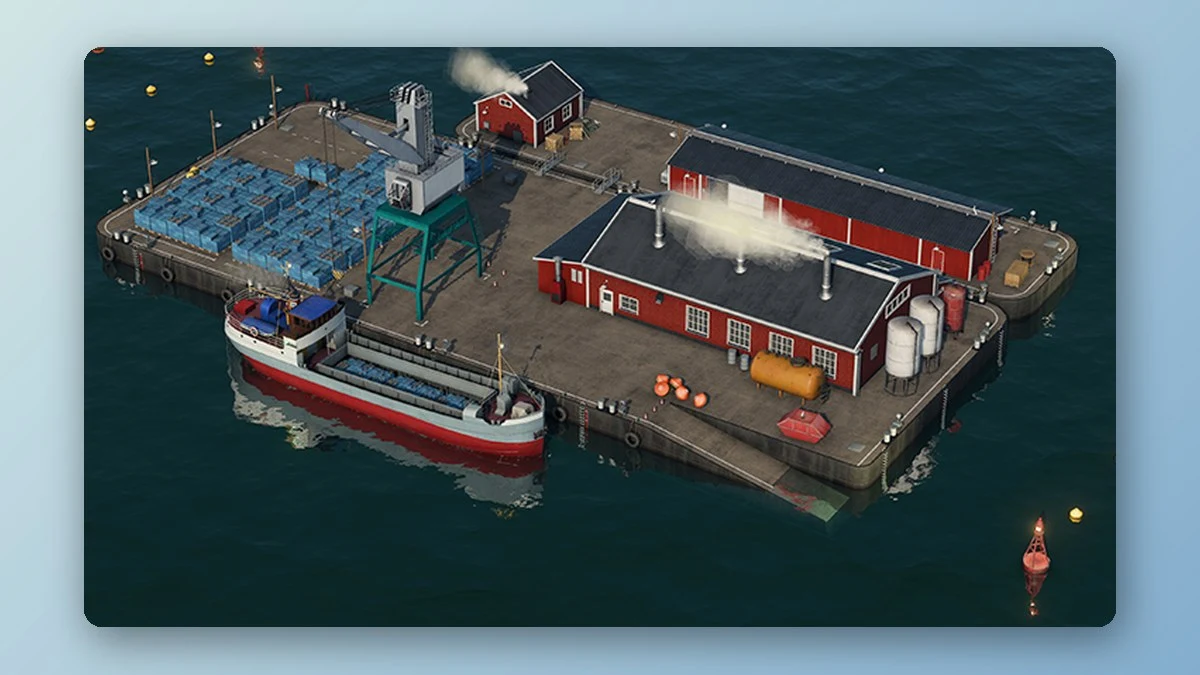
A Fishing Grounds is one of the quickest cargo starts. It produces 12 fish without needing any input, so a line that carries that fish to a town's commercial district can fill up fast. That only works where the town actually wants fish and the route is practical on your generated map, so check both before you commit.
How Transport Fever 3 Pays for Cargo: Distance, Detours and Speed
Cargo pays based on the straight-line distance between where it was picked up and where it was delivered, not on the length of the road or track the vehicle travels. Payment is only credited once cargo reaches the destination that uses it. A warehouse or transfer stop along the way doesn't complete the delivery, and once the final leg arrives, the payment is split among all the legs that carried the goods.
That makes a winding railway a poor way to earn more. Eight units of oil paid the same over a long, twisting track as over a direct one between the same two industries. The extra distance only added travel time and monthly upkeep.
Speed works the same way. A faster vehicle doesn't raise the payment for each unit of cargo between the same two points. A faster wagon carrying more units earned more in total, but only because it carried more. A fast vehicle is worth its higher running cost when it replaces several slower ones or clearly lifts how much gets delivered, and speed still helps by fitting in more trips each year.
Work Out the Full Cost and Borrow Only What Your First Route Needs
A construction preview rarely shows what a route really costs. Before you place anything, add up everything the route needs to earn money:
- Stations or stops at both ends
- The road or track linking them
- A depot the vehicles can reach
- The vehicles themselves
- Cash left over for running costs
Terrain, hills, and extra junctions can push the total well above the first price you see. In Free Game, a new company may start with little or no usable cash, which is why a loan is often how the first route gets built.
Loans sit in the company window, which opens from the Account panel in the lower-left corner. Each offer under the Loans tab lists an amount, a term in months, an interest rate, and a yearly payment. Hover over the yearly figure to see the actual monthly charge. Offers differ by start and save, so don't expect the same amounts every game.
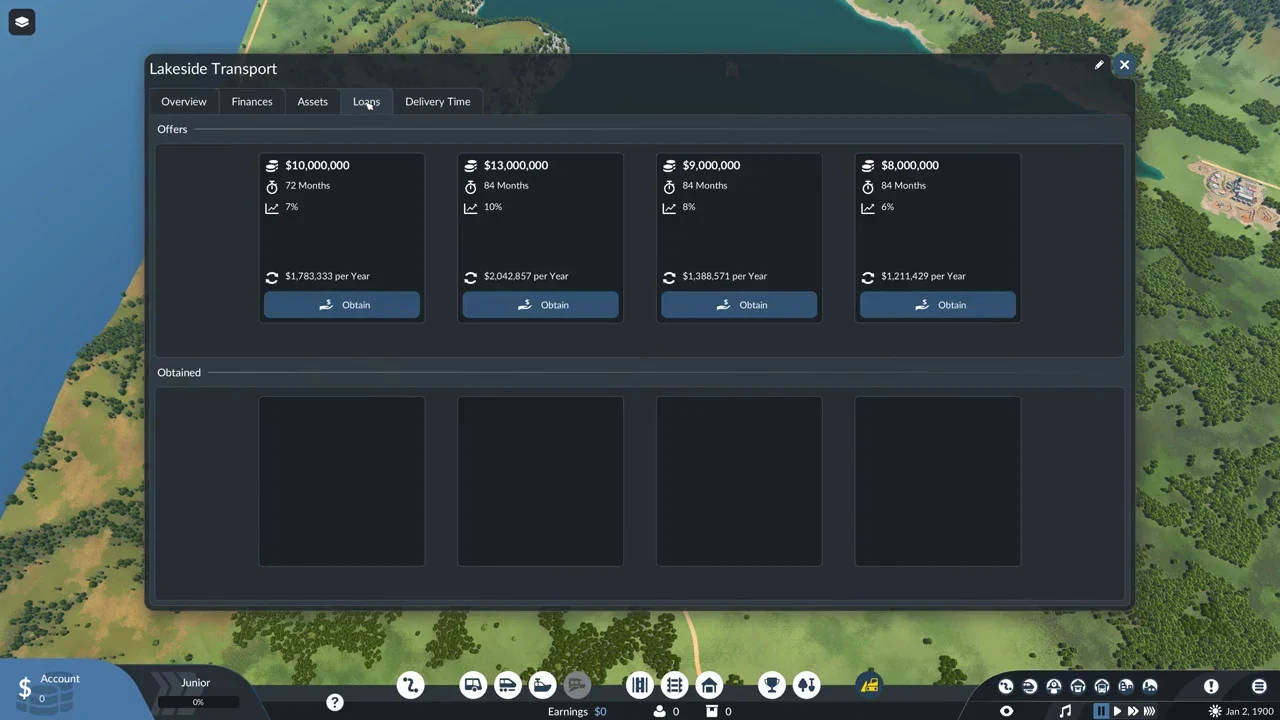
When you take an offer, the full amount goes into your account right away, and payments come out as each month turns over. Up to four loans can run at once. Compare the total cost of each offer, and borrow no more than the route needs to be finished. A loan pays for construction and doesn't count as income, so leave enough cash to run the line once it opens.
Build the Whole Line While the Game Is Paused
Pause the game while you set up, and finish the full chain before putting any vehicle on the road. A vehicle costs money to run from the moment it enters service, whether or not it's carrying anything. If you build a fish route from the fishing grounds to the city but start with the city leg, your trucks will patrol empty streets with no fish to collect while you pay their upkeep.
A workable order looks like this:
- Build both ends, the road or track between them, and the depot.
- Skip any road or track that doesn't link a producer to a real consumer. Keep terrain work to a minimum, since crossing hills with tunnels and bridges costs more.
- Let a little cargo or a few passengers collect at the stops.
- Assign vehicles and set their loading to Full Load (If Any), so they wait for a load instead of leaving empty.
Passenger lines follow the same pattern. They take time to gather their first riders, so crewing them the instant they're built often means running empty cycles.
Deliver Inside Each Cargo's Time Window
Every cargo type has a delivery window, and the limit shown in the game isn't fixed. It shifts as the years pass, so check the number on screen rather than relying on one you remember. Delivering inside the window is what earns full payment and keeps the rating of the town you're serving healthy. A missed window hurts that rating, which makes on-time delivery the target.
Perishable goods with tight windows are the best reason to spend on faster vehicles. Slow, low-value bulk cargo can run with cheaper vehicles. Spoilage works differently from what you might expect: the same amount of cargo paid the same whether it arrived at 0% or 83% spoilage. That doesn't mean spoilage can be ignored, because the time limit still matters for town rating and overall performance.
Keep Vehicles Full and Add Them Only When Cargo Is Waiting
Running costs come due every year whether a vehicle is full or empty, and an empty trip earns nothing. Start each line with one vehicle, then watch how much it carries and whether passengers or cargo are piling up at the stops. Add a second vehicle only when people or goods are visibly waiting, since more trucks on a line that already runs near empty just raises costs.
Match the vehicle to the job. The Stagecoach is a cheap early passenger option that carries six riders. The Steam Truck can haul any cargo type at a low running cost, which makes it a safe first freight vehicle. The ZIS-150 Stake carries more on a flatbed but costs far more to run each year, so choose it only when a line truly needs the extra space.
A vehicle that comes back empty can carry something on the return trip, but only when a real destination exists and the cargo suits the vehicle. A simple direct route with steady demand can stay more profitable than a complicated loop built just to keep every vehicle busy.
Check Each Line's Balance in Transport Fever 3 Before You Expand
Once a route is running, check whether it's paying. Open the Line Statistics screen with F2 and rank lines by their Balance column, then open Vehicle Statistics with F3 to find individual vehicles losing money. On the Balance chart, the income line should sit above the cost line.
A negative balance usually has a specific cause, and each one needs a different fix. A passenger service may not be carrying enough riders. Freight vehicles may run empty because their loading settings are wrong. A line feeding a warehouse can look like a loss while its goods wait for the onward trip. Find the cause before you cut anything.
Company rank can also change the math. Depending on the Inflation setting you chose at the start, rising through the ranks can reduce delivery payments. A line that only just breaks even early may become a loss later, so keep a margin. Add capacity only where cargo or passengers are waiting, and cut or redesign any line that runs empty or costs more than it earns.
Take Subsidies That Match a Route You Already Need
Subsidies can bring in cash faster than an ordinary route because the payment arrives when you accept. Some also offer a completion payment or a limited stretch of doubled income. The trade-off is that the deadline starts the moment you accept, and failing can take back the upfront money and add a fine or a reputation loss.
| Image | Subsidy offer | What the offer screen lists |
|---|---|---|
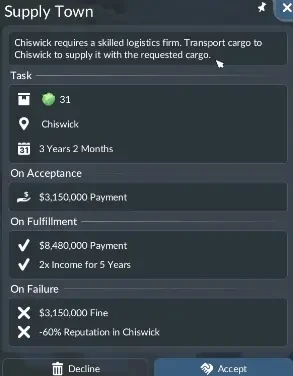 | Supply Town (Chiswick) | Acceptance payment, completion payment, doubled income and failure penalties |
Contract types include Supply Industry, Supply Town, Connect Towns, and Transport Workers. Offers can stay open for more than five months, and declining one costs nothing, so there's no need to rush. Build the route and get vehicles into position first, then accept, so travel to the site doesn't eat into the deadline. Offer types and terms change from save to save, so check each one as it appears.
Before you accept, check the following:
- Can the goods actually be produced and delivered?
- Which parts of the route already exist, and what still needs building or buying?
- Can the conditions be met before the deadline?
- Will the connection stay useful after any temporary bonus ends?
- How big are the advance, the completion reward, and the failure penalty?
Repay a Transport Fever 3 Loan Early Once Income Covers It
Repaying early makes sense once your routes can cover running costs without another loan. The Repay button clears the entire balance in one step, and it only works when your account holds enough to cover all of it. Paying early adds no penalty, because you pay exactly what's still owed, and it stops interest from building up on the remaining months.
Don't empty your account to do it. Keep a reserve for an unexpected capacity problem or a maintenance bill, and make sure the cash left over can still finish your next useful route. If you have to borrow again straight after repaying, you haven't gained much flexibility. A company that is debt-free with cash to spare is a better milestone than one that cleared its loans and left its next project unfunded.