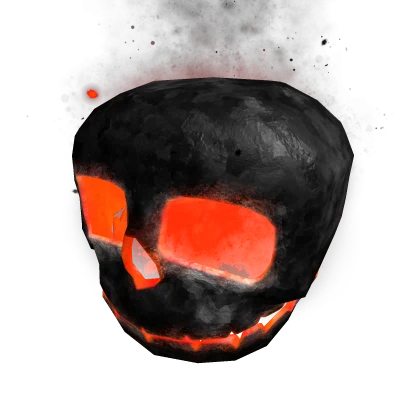
To get the Hollow Skull in Roblox’s The Hollow Hub, collect all nine relics from the elevator’s numbered floors, then complete the obstacle course on the secret floor marked “?”. Each numbered floor has a maze with a different puzzle that unlocks its relic.
Rewards are collectible only during the event’s reward window. Completing the route after that window closes does not guarantee you will receive the item.
| Floor | Puzzle | What you need to do |
|---|---|---|
| 1 | Purple line puzzle | Find five missing pieces and connect the board’s two endpoints. |
| 2 | Rotating pillars | Turn the required symbol toward the center on every pillar, then pull the lever. |
| 3 | Grave lock | Enter the symbols belonging to the three shortest lifespans, youngest first. |
| 4 | Tile path | Repeat the route demonstrated by the character beside the tiles. |
| 5 | Mirror puzzle | Redirect the light beam into the skull. |
| 6 | Witch’s Brew | Collect items matching the cauldron’s three requested colors and deposit them. |
| 7 | Pumpkin hunt | Collect a torch and light four pumpkins around the maze. |
| 8 | Object pedestals | Deliver five items, one at a time, to their matching blue pedestals. |
| 9 | Symbol levers | Match the room’s displayed symbol to a lever, then repeat until the relic appears. |
How to Get All 9 Relics in The Hollow Hub
Start at the cinema elevator and select the floor you want to complete. Maze layouts and item positions change between runs, so use the puzzle’s landmarks and instructions rather than memorizing corridor turns.
Monsters roam the floors while you explore. Keep track of nearby junctions and the route back as you search, especially on floors that require several trips between the puzzle room and the maze.
Floor 1: Find Five Pieces and Complete the Purple Line
Search the maze for five purple puzzle pieces, then find the DOORS-themed puzzle room. Place the missing pieces into the board and rotate its tiles until the glowing line connects the two endpoints.
Work outward from one endpoint, turning each tile so its line meets the next. You need one continuous connection; a tile pointing toward another piece without joining its line leaves the puzzle unfinished. Collect the revealed relic once the connection is complete.
Floor 2: Align the Pillar Symbols
Find the Dandy’s World-themed room and head upstairs to the pillars. Read the wall clue to identify your required symbol, then rotate the pillars until that symbol faces the center on all of them.
Turning one pillar also turns its neighbors. Watch those neighboring pillars after each interaction so you can plan the next move without undoing your progress. Once every pillar is correctly aligned and its beam reaches the center, pull the lever to release the relic.
Floor 3: Open the Coffin Using the Three Shortest Lifespans
Find the grave area and inspect the gravestones. Each stone has a symbol and birth and death years that determine its place in the combination.
- Subtract each birth year from its death year.
- Select the three smallest ages.
- Arrange those three ages from youngest to oldest.
- Enter their matching symbols into the coffin lock from left to right, then press Open.
Keep each symbol beside its age when taking notes. The puzzle asks who lived the shortest lives, so sorting by birth year or death year alone gives the wrong answer.
Floor 4: Repeat the Demonstrated Tile Path
Locate the puzzle room with a character standing beside a tile platform. Start the demonstration and watch which squares the character steps on while crossing.
Step on those same tiles in the same order to reach the relic. Remembering the route in short groups makes it easier to follow, especially if several tiles sit close together. Focus on the full sequence before attempting the crossing.
Floor 5: Reflect the Light Into the Skull
Find the mirror room and trace the beam from its starting point. Rotate the mirrors to pass the light onward until it reaches the skull.
Start with the first broken connection and work toward the target, checking the beam after each adjustment. Changing mirrors at random makes it harder to see which turn disrupted the path. Lighting the skull completes the puzzle and reveals the relic.
Floor 6: Match the Witch’s Brew Ingredients
Enter the Animal Hospital-themed puzzle room and find the Witch’s Brew cauldron on the right. Read its three requested colors, then search the hospital for items matching those colors.
Bring the matching items to the cauldron and deposit them to complete the brew. Use the colors displayed on your own cauldron rather than assuming every attempt needs the same ingredients. Collect the relic once it appears.
Floor 7: Light Four Pumpkins With the Torch
Find the puzzle room and interact with the burning brazier to collect a torch. Carry it into the maze and light four pumpkins scattered around the floor.
Note any pumpkin locations you pass before finding the torch. That gives you places to return to once you can light them, instead of searching the entire maze again. Lighting all four makes the seventh relic appear.
Floor 8: Deliver Five Items to Their Matching Pedestals
Find the puzzle room containing five items. Each belongs on a glowing blue pedestal with its matching outline somewhere in the maze.
You can carry only one item at a time. Locate a pedestal and identify what it needs before returning for that item, then repeat for the remaining four. Placing all five completes the puzzle and gives you the relic.
Floor 9: Follow the Symbols to the Correct Levers
Locate the Piggy-themed puzzle room and check the symbol displayed on its closed barrier. Search the maze for a lever bearing that symbol and pull it.
Return to the room to read the next symbol, then find its matching lever. Keep repeating this sequence until the final barrier opens and the ninth relic becomes available. Check each new symbol before leaving the room so you know exactly which lever to find.
How to Complete the Secret Floor and Get the Hollow Skull
Once all nine relics are collected, return to the hub elevator and choose “?”, the secret tenth floor. This changes the challenge from maze puzzles to nine obstacle-course sections, with portals connecting the route.
Move through each section while watching the monsters guarding the platforms. Most attacks cover a cone-shaped area in front of the creature, so wait outside that area before crossing. Seek behaves differently: it rushes straight toward you, making its direction the main thing to watch.
Use each portal to continue through the course. Complete all nine sections and reach the end to earn the Hollow Skull, provided the event’s reward window is still open.