The best crystal route in [🗻] Mine Antarctica is also the coldest one. Start at base, climb while mining, and turn back before the temperature costs you health, or when your bag is full. Once you sell or store the run's crystals, spend the Cash on the upgrade that fixes your current bottleneck instead of following a single upgrade order.
How to Start Mining in Mine Antarctica
Your first run starts at the base of the mountain. Equip the pickaxe from your hotbar, follow the route toward the mountain, and use it to break through rock as you climb. The goal is to bring crystals and hidden treasure back to base, not to dig in one spot until your health is already in danger.
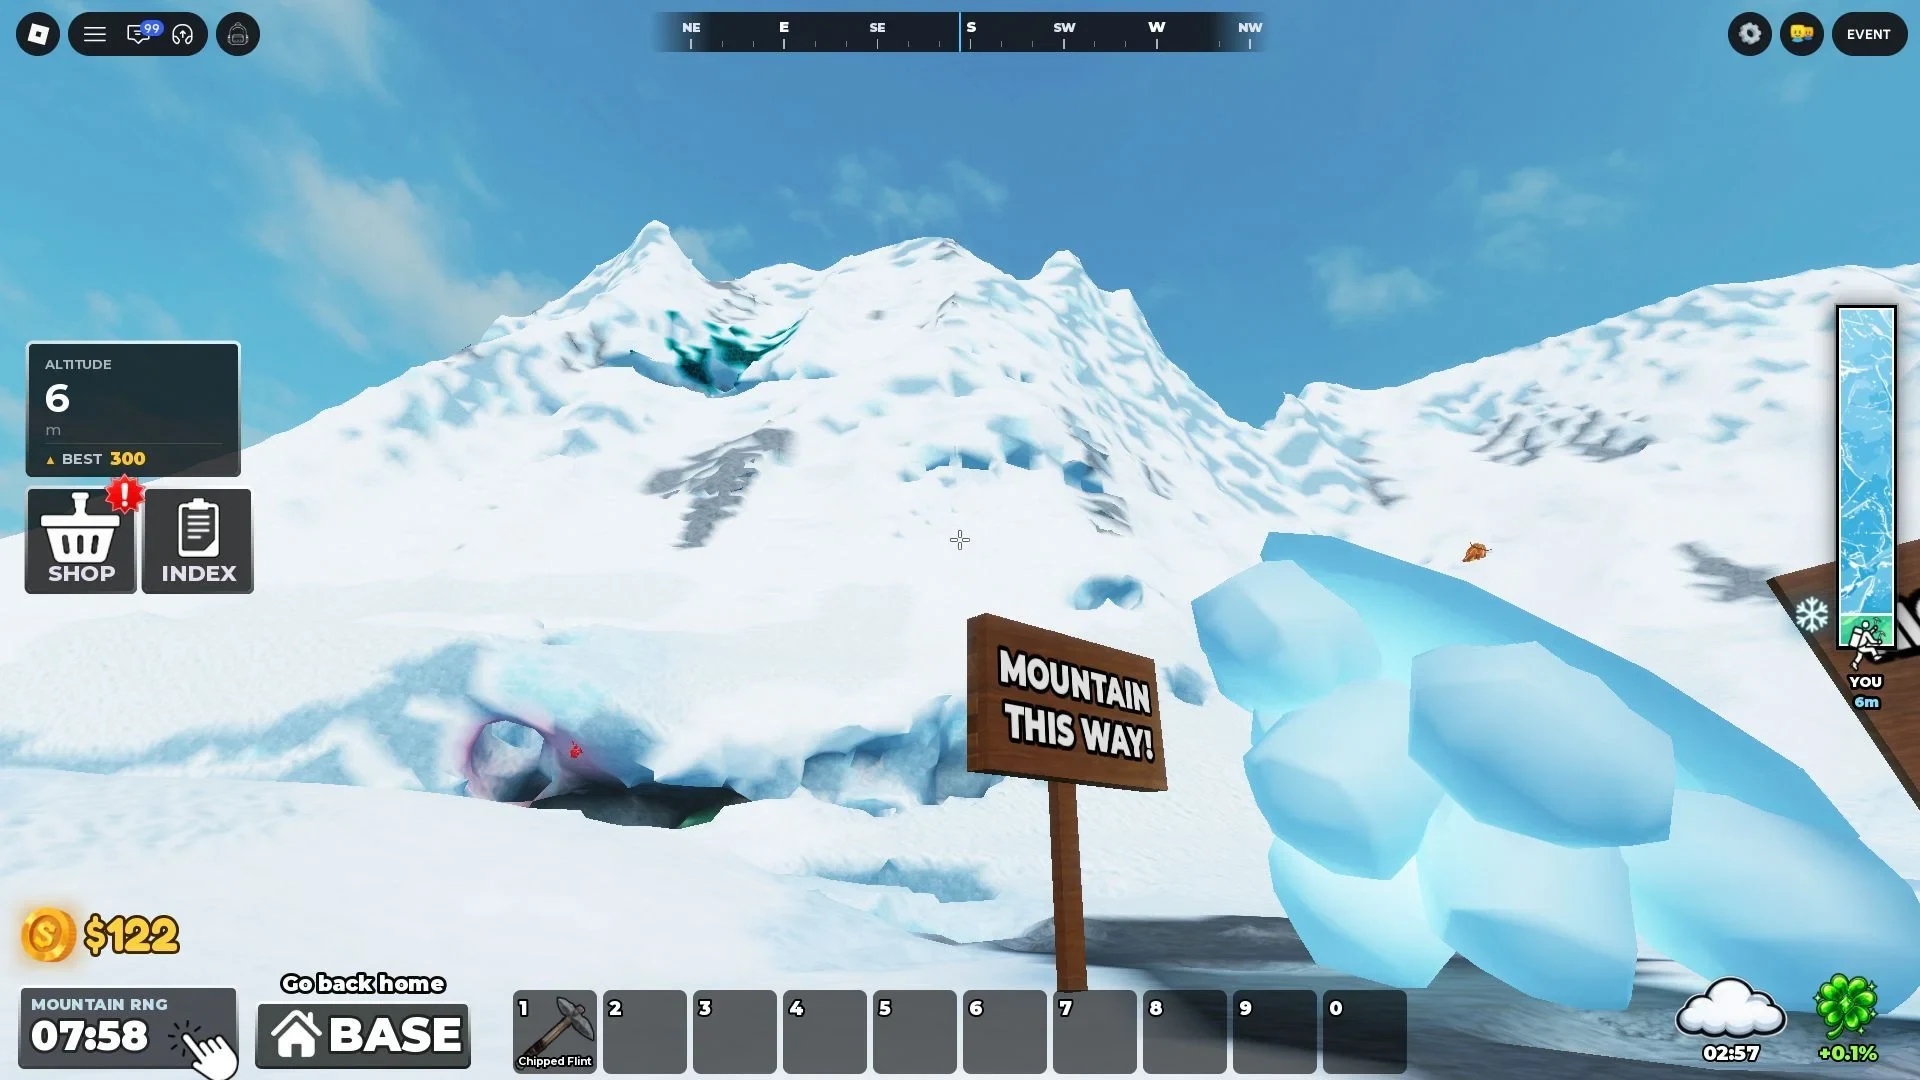
The mountain entrance HUD gives you useful landmarks for the first few trips: the altitude display shows how far you have climbed, while the Cash counter tracks the money available for upgrades. You can also see the Shop and Index controls, the Mountain RNG panel, the pickaxe hotbar, and the Go back home or BASE return control.
PC controls
The following inputs are the PC controls documented for Mine Antarctica. Mobile and console controls may use a different layout.
| Action | PC input | What it does |
|---|---|---|
| Move | W, A, S, D | Move through the mountain and choose your climbing route |
| Jump | Spacebar | Jump while navigating the path |
| Interact or equip | E | Interact with prompts or equip the selected tool |
| Use tool | Left mouse button | Swing the pickaxe to mine |
On the first climb, focus on learning the route and recognizing the temperature and health indicators. Mine crystals as you move upward, then return while the run is still safe. That gives you Cash for the next decision without needing exact prices or a fixed bag-size target.
How to Mine Higher Without Freezing in Mine Antarctica
Climbing is the useful direction when you are trying to find better crystal opportunities. The game makes the tradeoff clear: the higher you go, the colder it becomes. For early runs, climb toward higher sections when you want better crystal opportunities rather than assuming that digging deeper at the same level will improve your yield.
Use this action order on every run:
- Start from the base and set a safe height. Begin with a section you can reach without letting the cold become the only thing you are managing. Your warmth upgrade determines how much cold you can tolerate, so your safe ceiling will rise as that stat improves.
- Mine while you climb. Keep moving toward a higher section instead of spending the entire run digging deeper at the same level. Pick up crystals and watch both temperature and health as the altitude increases.
- Retreat when the cold becomes dangerous. Once the cold starts draining health, staying longer makes the loss accelerate. Use the visible
Go back homeorBASEcontrol to return with your loot before a risky climb turns into a lost run.
Don't rely on a fixed height, timer, or warmth threshold for every character. Treat health loss as a clear retreat signal, and use the in-game temperature and health indicators to decide whether the next higher section is worth attempting.
How to Sell and Store Crystals in Mine Antarctica
A mining run only becomes progression after you get the loot back to base. Return when your bag is full or the cold is starting to drain health, then sell the crystals at the base to earn Cash. Use the current prices and capacity shown in your own interface rather than relying on a fixed number.
The garden is an optional way to turn crystals into more digging luck. Place crystals there if you want to use that system, but do not expect a guaranteed rarity increase from a specific crystal or a fixed percentage. The official game description also says that liking Mine Antarctica and joining the PolarMine Games group grants +1 Mining Luck, which you can claim before you make the loop more demanding.
A simple early-run rhythm is:
- Mine until your current climb or bag limit becomes the problem.
- Return to base before cold damage or an overfull bag ends the run.
- Sell crystals for Cash, or place them in the garden when you want the digging-luck benefit.
- Spend the Cash on the stat or tool that removes the problem you just encountered.
Mine Antarctica Upgrade Priority: Warmth, Pickaxe, or Backpack?
Mine Antarctica's upgrade choices solve different problems, so the best next purchase depends on why your last run stopped. Warmth controls how far you can push into the cold, backpack capacity reduces return trips, and the pickaxe determines how efficiently you can break rock and handle tougher crystals.
| Upgrade | Choose it when | Why it matters |
|---|---|---|
Warmth or Climb Higher | Cold or health ends the run before you reach the section you want | More cold tolerance gives you room to attempt higher, colder parts of the mountain |
| Pickaxe | Mining speed or rock resistance is holding you back | Better Power and Mine Size ratings make mining easier and help with crystals that resist lower-tier pickaxes |
Backpack or Carry More | You are still safe to climb, but the bag fills before the route pays off | More carry capacity lets you keep mining longer before a sell trip |
Use the table as a diagnosis, not a permanent ranking. If cold is the reason you retreat, buy warmth first. If you consistently return with a safe health bar but a full bag, backpack capacity is the more direct fix. If you can reach the route but struggle to break its material, improve the pickaxe.
That conditional order matters because early low areas can make backpack or pickaxe upgrades feel more useful, while colder, higher sections make warmth the requirement for staying in the route at all. Keep enough warmth for the height you are attempting, then spend the next purchase on the carry or mining limitation that is costing you the most progress.
Mine Antarctica's Garden, Hourly Zones, and Extra Tools
Once the basic mine, retreat, sell, and upgrade loop feels familiar, the other systems become easier to evaluate. The game says that a new Antarctic mining zone appears every hour. It does not publish a complete zone list or a universal rotation table, so use the zone you can currently see and adjust your warmth target rather than planning around unnamed zones.
Bombs and radars are optional tools for later runs. Bombs are limited consumables with different secondary effects, while radars can help locate buried treasure from a set range and may offer extra effects such as mutation or luck. Read their in-game descriptions before spending Cash; they should supplement, not replace, the regular pickaxe route.
Mine Antarctica Beginner Mistakes to Avoid
- Waiting for a fixed cold threshold: No single height or timer tells every player when to turn back. Watch your temperature and health instead, and leave when the cold begins to damage you.
- Digging deeper when your goal is better crystals: Use the climb as your progression direction. Digging deeper at the same level does not automatically improve what you find.
- Ignoring a full bag: A successful climb still needs a base return. Bring the loot back while the run is safe, then sell it for Cash.
- Buying one upgrade by habit: Warmth, pickaxe, and backpack answer different failure points. Choose the one that addresses why you had to stop.
- Treating the hourly zone statement as a complete map rotation: The game confirms an hourly new zone, but it does not provide names or old-zone behavior. Do not rely on an invented route list.
- Using bombs or radars before the main loop works: These are limited tools. First make sure you can consistently mine, retreat, and convert a run into Cash.
For your next run, equip the pickaxe at base, climb until warmth or health becomes the limit, return when the bag is full or the cold turns dangerous, and spend the resulting Cash on the bottleneck you just observed. Then test a slightly higher safe route and repeat.